Temporal Table in SQL SERVER 2016. Migrate An Existing Solution to Use System Versioning.

Note: This topic applies to Microsoft SQL SERVER 2016.

In my previous Blog Post we have learned about how to implement Temporal Table on a new table? For more information on Temporal table please follow Temporal Table in SQL SERVER 2016.

Let’s assume that we have below solution managed via stored Procedure for System Versioning. In this existing solution we have a table called dbo.SalesPerson and if the Sales Person’s region changed then we maintain the history in the table called dbo.SalesPersonHistory.

Step1: First let’s create a Demo Database Called SQL2016Demo.

USE master
Go

— Drop database
IF DB_ID (‘SQL2016Demo’) IS NOT NULL
    DROP DATABASE SQL2016Demo;
GO
CREATE DATABASE SQL2016Demo;

Output: Below Image show that SQL2016Demo Database is created.

Image1:


Step2 : In this step we will create a table called dbo.SalesPerson with an assumptions that each sales person has their sales region and their Sales Region sales over the time, when Business change their sales region we need to keep their Historical Sales Regions in a table called dbo.SalesPersonHistory. Here, in this example we have two columns called RowStartDate and RowEndDate to track the changes for the Sales Region for each SalesPerson over the period of time.

USE SQL2016Demo;
GO
CREATE TABLE dbo.SalesPerson
(
SalesPersonId    
Int IDENTITY,
SalesPersonName   Varchar (50),
SalesRegion       Varchar (50),
RowStartDate      date NOT NULL Default GetDate (),
RowEndDate        date NOT NULL Default ‘2079-12-31’,
Constraint PK_SalesPerson_SalesPersonId Primary Key(SalesPersonId)
);
GO

CREATE TABLE dbo.SalesPersonHistory
(
SalesPersonId     Int NOT NULL,
SalesPersonName   Varchar (50),
SalesRegion       Varchar (50),
RowStartDate      date NOT NULL,
RowEndDate        date NOT NULL
);
GO
–Populate the dbo.SalesPerson Table with some initial data.
INSERT dbo.SalesPerson(SalesPersonName , SalesRegion , RowStartDate)
Values (‘John Smith’ , ‘Hertfordshire’ , ‘2015-05-01’) ,
       (‘Anthony Webster’ , ‘South West London’, ‘2015-05-01’),
       (‘Matt Williams’ , ‘Kingston upon Thames’, ‘2015-05-01’),
       (‘James Jenkinson’ , ‘Croydon’, ‘2015-05-01’),
       (‘Tom Bailey’ , ‘Slough’, ‘2015-05-01’)
GO


Step3: In this step we are creating a stored procedure to update the Sales Region for the Sales person and keep their historical Sales Region in SalesPersonHistory Table. Please find below T-SQL to create a stored procedure and update the Sales Region for the Sales Person Id 1 and 2.

USE SQL2016Demo;
GO

Create Procedure dbo.usp_UpdateSalesPersonRegion(@SalesPersonid INT, @SalesRegion Varchar(50))
As

Begin
SET NOCOUNT ON;
    UPDATE dbo.SalesPerson SET SalesRegion = @SalesRegion ,
                    RowStartDate = GetDate()
    OUTPUT    inserted.SalesPersonId,
inserted.SalesPersonName,
deleted.SalesRegion,
deleted.RowStartDate,
GetDate()-1 as RowEndDate
INTO dbo.SalesPersonHistory(
SalesPersonId,
SalesPersonName,
SalesRegion,
RowStartDate,
RowEndDate)
Where
SalesPerson.SalesPersonId = @SalesPersonid;
SET NOCOUNT OFF;
END

GO
EXEC dbo.usp_UpdateSalesPersonRegion @SalesPersonid = 1,
@SalesRegion = ‘North West London’
GO
EXEC dbo.usp_UpdateSalesPersonRegion @SalesPersonid = 2,
@SalesRegion = ‘Hertfordshire’

Please find below Image2: which show how the records look like in dbo.SalesPerson and dbo.SalesPersonHistory table.

Image2:

So far, I have implemented a solution via stored procedure which maintains system versioning for the sales person’s historical sales regions in to SalesPersonHistory table. Now we are going to learn how we can migrate this existing solution to system versioning or Temporal Table.

How to Migrate Existing Solution to use System Versioning?

Step1:

The first change we need to do is that in our dbo.SalesPerson table maximum date value for RowEndDate is 2079-12-31 but System versioning required it to be the 9999-12-31 otherwise it will throw below error. So let’s update the RowEndDate to as 9999-12-31.

Error: ADD PERIOD FOR SYSTEM_TIME failed because table ” contains records where end of period is not equal to MAX datetime.


USE SQL2016Demo;
GO

UPDATE dbo.SalesPerson SET RowEndDate =
                       CONVERT (DATETIME2, ‘9999-12-31 23:59:59.9999999’)
GO

Step2: Follow below T-SQL code to migrate existing solution to use System Versioning.

USE SQL2016Demo;
GO

— Drop existing Stored Procedure, we also need to remove this stored procedure from the calling application.
DROP PROCEDURE usp_UpdateSalesPersonRegion;

— Adjust the schema for current and history table
–Drop the Default Constraint from column RowStartDate and RowEndDate On table dbo.SalesPerson;

ALTER TABLE dbo.SalesPerson
DROP CONSTRAINT DF_SalesPerson_RowStartDate;
ALTER TABLE dbo.SalesPerson
DROP CONSTRAINT DF_SalesPerson_RowEndDate;— Change data types for existing period columns
ALTER TABLE dbo.SalesPerson
ALTER COLUMN [RowStartDate] datetime2 NOT NULL;ALTER TABLE dbo.SalesPerson
            ALTER COLUMN [RowEndDate] datetime2 NOT NULL;

ALTER TABLE dbo.SalesPersonHistory
ALTER COLUMN [RowStartDate] datetime2 NOT NULL;
ALTER TABLE dbo.SalesPersonHistory
ALTER COLUMN [RowEndDate] datetime2 NOT NULL;

— Add SYSTEM_TIME period and set system versioning with linking two existing tables — (a certain set of data checks happen in the background)

ALTER TABLE dbo.SalesPerson
ADD PERIOD FOR SYSTEM_TIME ([RowStartDate], [RowEndDate])

ALTER TABLE dbo.SalesPerson
SET (SYSTEM_VERSIONING = ON (HISTORY_TABLE = dbo.SalesPersonHistory, DATA_CONSISTENCY_CHECK = ON))


Related Post

Temporal Table in SQL SERVER 2016
How to Implement Temporal Table on a New Table?

Temporal Table in SQL SERVER 2016: How to Implement Temporal Table on a New table?

Note: This topic applies to Microsoft SQL SERVER 2016.

In my Previous Blog post Temporal Table in SQL SERVER 2016 we have learnt about Temporal Table which Microsoft has introduced in SQL SERVER 2016. In this Blog post we will be learning how to implement Temporal Table on a new table?

Step1: First let’s create Demo Database Called SQL2016 Demo.


Output: Observer Image1, Demo Database is created.

Image1:

Step2: In step we will implement Temporal Table or System Versioned table called Department without specifying History_Table option. In below transact SQL we haven’t use HISTORY_TABLE = [History_Table_Name] option, we have just use WITH (SYSTEM_VERSIONING = ON) option. In step 3 I will explain you how to use HISTORY_TABLE option.

Output: With the help of above transact SQL we have implemented a temporal table or System-Versioned table called Department and as we have not specified historical table name so system has created a table called dbo.MSSQL_TemporalHistoryFor_885578193 (History) highlighted in yellow in below Image2. Also History table is underneath the current table. In ideal world it is not easy to remember or workout which table is the history table for Department or any Temporal Table if the table name is like MSSQL_TemporalHistoryFor_%, so in next step we will be implementing Temporal Table with proper history table name?

The Department table has also period definition column called SysStartTime and SysEndTime of datetime2 data type. Please observe in blue circle in below image Image2.

Image2:

Step3: In step we will implement Temporal Table or System Versioned table called Department1 with specifying History_Table option. In below transact SQL we use HISTORY_TABLE = [Department1_History] option. Here in this step I will creating table called Department1 instead of Drop the existing table called Department. To drop table system versioned table, it requires to disable the system versioning on the table then we can drop the table. I will explain how to disable the System version on the table and Drop table or change the schema later on.

Output: So, in this step we implemented a Temporal Table or System-Versioned table called Department and we have specified historical table name called Department1_History so the system has created table called dbo.Department1_Histsory (History) highlighted in yellow in below Image3. Also History table is underneath the current table.

Image3:

So, in this Blog post we learnt how to implement Temporal Table or System versioned table on a new table, with specifying History_Table option and without specifying History_Table option.

Related Post

Temporal Table in SQL SERVER 2016

Migrate an Existing Solution to Use System Versioning.

Temporal Table in SQL SERVER 2016.

Note: This topic applies to Microsoft SQL SERVER 2016.

Microsoft have introduces a support for temporal table (Track historic changes) as a database feature in SQL SERVER 2016 which provides built in support for provide information about data stored in the table at any point in time rather than only the data that is current at the moment of time. Let’s understand what is temporal table? , Why do we need temporal table, how does this temporal table work?

What is Temporal Table?

Temporal table is table for which PERIOD definition exists and it contains system columns called as SysStartTime and SysEndTime with a datatype of datetime2 into which the period of validity recorded by the SQL SERVER, and temporal table has associated history table. This historical table holds all the prior versions of each record with their period of validity and this all has been managed by SQL SERVER internally. With temporal table we can determine value of the record at any point in time rather than just the current value of the each record. A temporal table is called as system-versioned table.

Why do we need temporal table?

Real data sources are dynamic and historical data analysis is often key to business success. We can use temporal table in below cases.

  • Time Trend: To understand the business trends over time or Tracking data changes over time.
  • Data Audit: Auditing all changes to data.
  • Slow Changing dimension, useful for data warehouse load for Type 2 Dimension.
  • Repair Record Level corruption: in the event of accidental update/delete you can easily recovered each record from history table.

How does temporal table work?

Implementations of a temporal table involves pair of tables, current table and history table. With each of these tables, two additional datetime (datetime2 datatype) columns are used to defined period of validity for each record – a system start time (SysStartTime) column and a system end time (SysEndTime) column. The current table contains the current value for each record. The historical table contains the each previous value for each record, if any, and the start time and end time for the period for which it was valid.

INSERTS: On an INSERT of a record the system set the value for the SysStartTime column to the UTC time of the current transaction based on the system clock and set the value for the SysEndTime column to the maximum value of 9999-12-31 – this marks the record as open.

UPDATES: On an UPDATE, the system stored the previous value of the record in the history table and sets the value for the SysEndTime column to the UTC time of the current transaction based on the system clock. This marks the record as closed, with a period recorded for which the record was valid. In the current table record is updated with its new value and system sets the value for the SysStartTime column to the UTC time of the current transaction based on the system clock. The value for the updated record in the current table for the SysEndTime column remains the maximum value of 9999-12-31.

DELETES: On a DELETE, the system stored the previous value of the current record in the history table and sets the value for the SysEndTime column to the UTC time of the current transaction based on the system clock. This marks the record as closed with a period recorded for which the previous record was valid. In the current table the record is removed and queries of the current table will not return this value. Only queries that deal with history data return data for which a record is closed.

MERGE: On a MERGE behaves as an INSERT, an UPDATE, or a DELETE based on the condition for each record.

For More information about Temporal Table please follow:

1) https://msdn.microsoft.com/en-us/library/dn935015%28v=sql.130%29.aspx

2) http://channel9.msdn.com/Shows/Data-Exposed/Temporal-in-SQL-Server-2016

Related Post

How to Implement Temporal table on a new table?

Migrate an Existing Solution to Use System Versioing.

SQL SERVER 2016 New Features in SQL SERVER Integration Services 2016

Microsoft hasn’t make any changes in SQL SERVER 2014 Integration Services but below features are added in SQL SERVER 2016.

Always On Support

The AlwaysOn Availability Groups feature Microsoft has introduced in SQL SERVER 2012 as a high-availability and disaster-recovery solution which provides an enterprise level alternative to database mirroring. A unique set of read-write user databases are setup as part of AlwaysOn Availability Groups are called availability databases. An Availability Group supports a failover environment for these availability databases that fail over together, thus maximizes the availability of a set of user databases for an enterprise.

Microsoft has introduced SSISDB catalog (i.e. SSISDB user database) in SQL SERVER 2012, which is the central point for working with SQL SERVER Integration Services (SSIS) projects that we have deployed to the Integration Services Server. I.e. we set projects and package parameters, configure environment to specify runtime values for packages, execute and troubleshoot packages and manages Integration Servers operations. SQL SERVER Integration Services Projects, Packages, Parameters, environments and operations history are stored in SSISDB catalog. In SQL SERVER 2016, in order to provide high availability for SQL SERVER Integration Services SSISDB database (contains Projects, Packages, Parameters, environments and operations history etc.), we can add the SSISDB Database to the AlwaysOn Availability Groups just like an any other user database. In the event of failover one of the secondary node becomes the primary node.

Incremental Package Deployment

With the help of this new Incremental Package Deployment feature we can deploy one or more package to the existing or new projects without deploying the whole project. We can incrementally deploy packages using: Deployment Wizard, SQL SERVER Management Studio (uses Deployment Wizard), stored procedures, and Management Object Model (MOM) API at this time.

Note: In SQL SERVER 2016, the Incremental Package Deployment feature is not available in SQL SERVER Data Tools for BI (SSDT-BI).

Project Upgrade

When we upgrade our SSIS Projects from previous version to current version, the project-level connection managers will continue to work as normal and the package layout or annotations are retained.

Lookup Transformation in SQL Server Integration Services

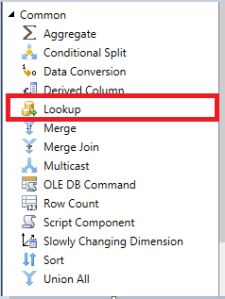
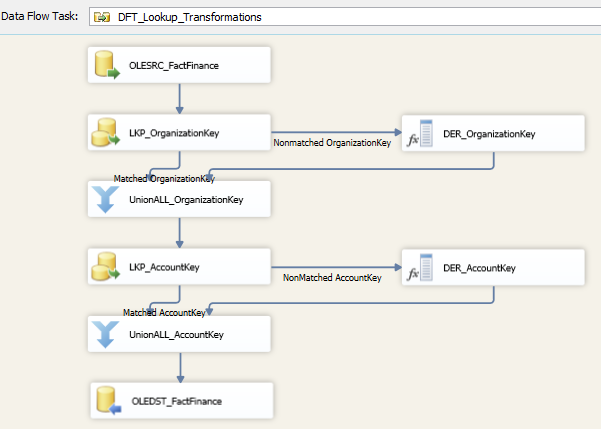
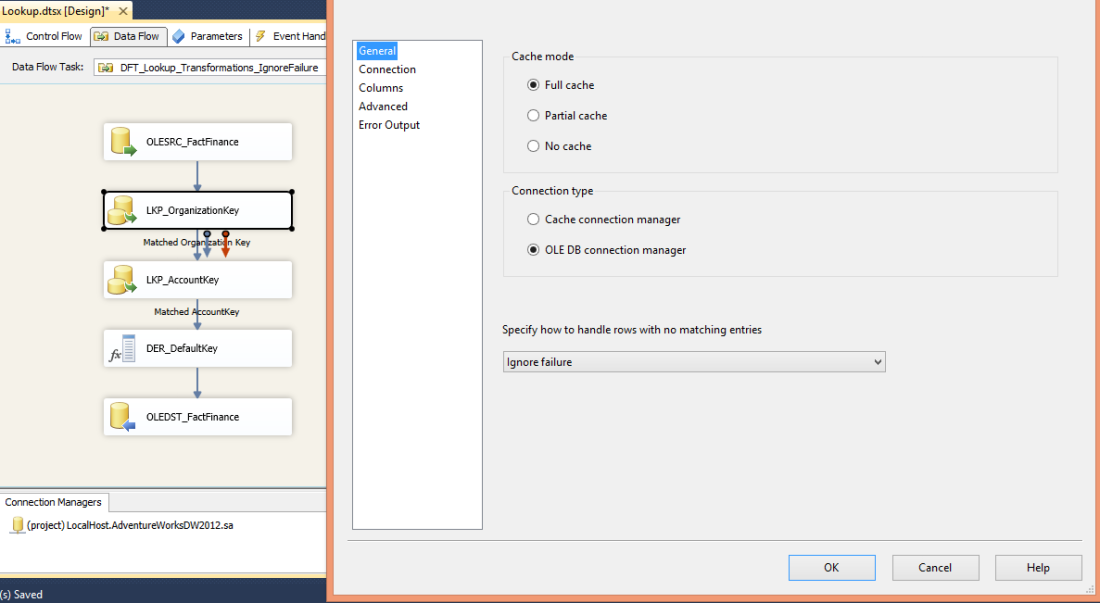
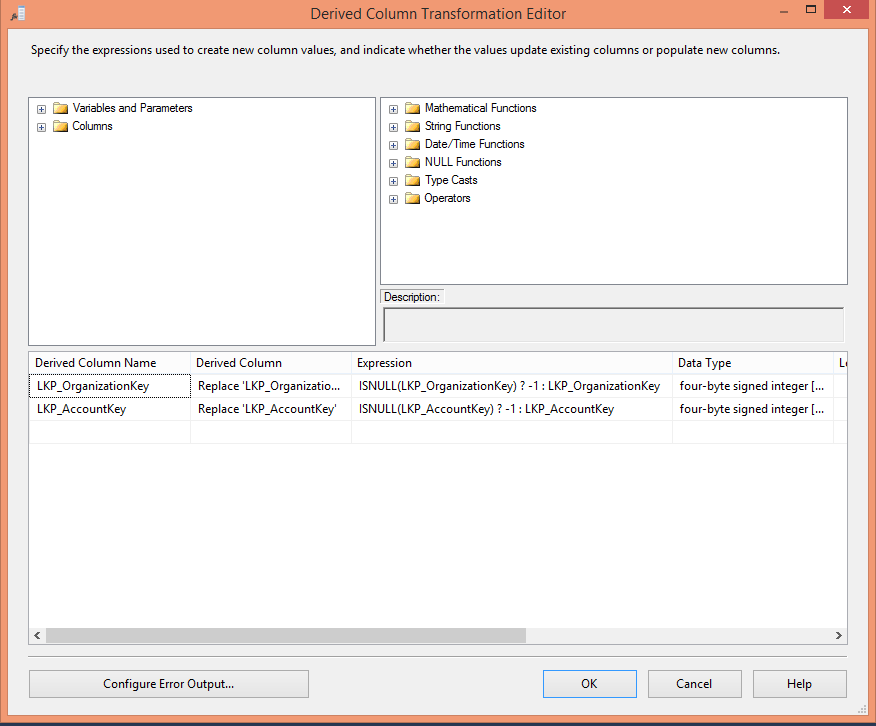
Lookup Transformation performs lookups by joining data in input columns with column in a referenced data set. Lookup Transformation are very useful in SQL Server Integrations Services ETL process in Data warehouse builds where we load data from various data source systems. Lookup transformations is a synchronous transformation. This means it does not block the data flow pipe line. Image: Lookup 1.0 Lookup_Image_1.0

Note: Lookup Transformation is case sensitive, so for any string match we need to covert the dataset to either lower or upper case in source SQL using UPPER() or LOWER() T-SQL functions or we could use character map transformation to convert the dataset to upper or lower case. Cache Mode: Lookup Transformations have below three cache mode options, which allows us to specify how referenced data set is stored in memory. Image: Lookup 2.0 Lookup_Image_2.0 Full cache: It is a default cache mode. In this mode data will be queried to database during the pre-execute phase of the data flow task. This mode used most memory and takes additional start up time for the data flow task, and all of the caching happens before any rows retrieved from the data flow source but it will be very fast during execution. One thing to remember that it will not swap memory to disk until the process (package execution) finished so it is important to manage memory resource. I have seen many people set full table/view name (i.e. do not use SELECT Column1 , Column2 From [TableName], Required Columns Only.) with 50 columns or more with more than 10 million rows which consume large amounts of memory about 5-8 GB RAM instead of required columns which consume hundreds of MB. Partial cache: In this cache mode Lookup cache is empty at the beginning of the data flow. When a new row comes in, the Lookup Transformation checks its cache for the matching values. If no match is found it queries the database. If match is found the values are cached they can be used the next time a matching rows comes in. No Cache: This cache mode is only keeps last match row in to memory, it means that in this mode Lookup Transformation query database for each row. Connection Type: We will have below to connection type options. Image: Lookup 3.0 Lookup_Image_3.0 Cache connection manager: Cache connection manager is useful to reduce data base load while using reuse cache. It is also useful to reuse cache between different data flow task and Lookup Transformations to manage memory more efficiently. We can reuse cache for role playing dimensions such as Date, time and other role playing dimensions in your data warehouse. We must add Lookup transformation in separate data flow task, this will allow cache transformation to populate Cache connection manager before the Lookup Transformation execution starts. The advantage of Cache connection manager is we can do Lookup Transformation against non OLE DB data sources. Note: Cache connection manager does not support Binary Large Object (BLOB) data types DT_TEXT, DT_NTEXT, and DT_IMAGE. If reference dataset contains a BLOB data type, the component will fail when we run the package. OLE DB connection manager: We can use OLE DB Connection manager for OLE DB data sources. Specify how to handle rows with no matching entries. This allows options for handling rows that do not match at least one entry in the dataset. Image: Lookup 4.0 Lookup_Image_4.0 Fail Component: This is default selected option. Package fails if any of the rows failed to match with referenced data set or raw caused error, for example data truncation. Note: People leave this option in production SSIS Package which is not idle because when we schedule a package for an overnight run and early morning we found schedule job failed. It is better to set default key for the failed row match and report in the morning or Redirect Rows to Error Output with some form of the reporting. Ignore Failure: This option sends any nonmatching rows and any rows that cause errors (such as truncation error) to the same output as matched rows, but any lookup values will be set to null. It is like a LEFT OUTER JOIN in SQL query but not returning any duplicate rows. Redirect Rows to Error Output: This option sends any nonmatching rows and any rows that cause an error to the error output (output with red arrow). Redirect Rows to no Match Output: This option sends any nonmatching rows output to the no match output and error rows to the error output (output with red arrow). We can load data to the Fact table load with below two options. We will try and compare which option is faster, uses less resources and required less development and maintenance efforts. I am not going to go through each steps, but through the below print screens I wanted to prove an effective way to use Lookup transformations in fact table load which has about 15-20 dimensions or more. Option 1: In Image Lookup 5.0 we can see that I have redirected the Lookup transformation LKP_OrganizationKey’s no match output “Nonmatched OrganizationKey” to “DER_OrganzationKey” Derived Column transformation and match output to “UnionALL_OrganizationKey” Union All transformation. Same as, LKP_AccountKey Lookup Transformation’s non matched output “NonMatched AccountKey” to DER_AccountKey Derived Column transformation and matched output “Matched Accountkey” to DER_AccountKey Derived column transformation. Many people uses option 1 with lookup transformation, if match is not found set default value in Derived column transformation and merge match output with Union ALL Transformation. Image: Lookup 5.0 Lookup_Image_5.0 Option 2: In Image Lookup 6.0 I have selected, ignore failure option to specify how to handle rows with no matching entries. So all the match output, no match output rows with NULL Lookup column results and any error rows are redirected to the same match output pipeline for LKP_OrganizationKey and LKP_AccountKey Lookup transformations. Then in DER_DefaultKey derived column transformation I have added expression in Derived column transformation editor as per Image Lookup 7.0. Image: Lookup 6.0 Lookup_Image_6.0 Image: Lookup 7.0 Lookup_Image_7.0 Conclusion: As we have seen that Lookup transf-ormation is non-blocking transformation but if we use it with Union ALL transformation (Option1) which is partial blocking transformation so the whole transformation becomes partial blocking transformations. Also, if we have more than 15-20 dimension then we will have to spend more time in development. Option 2 is much faster because and less resource intensive because Lookup Transformation and Derived Column Transformation both are non-blocking transformation. Also, option 2 is best for best practices.